DSAR-In Validation
Overview
This is the stage where the request is validated and moved to processing upon successful validation, or additional details may be sought from the submitter if needed. A single flow can have multiple action items, which can be configured on the 'Flow' tab.
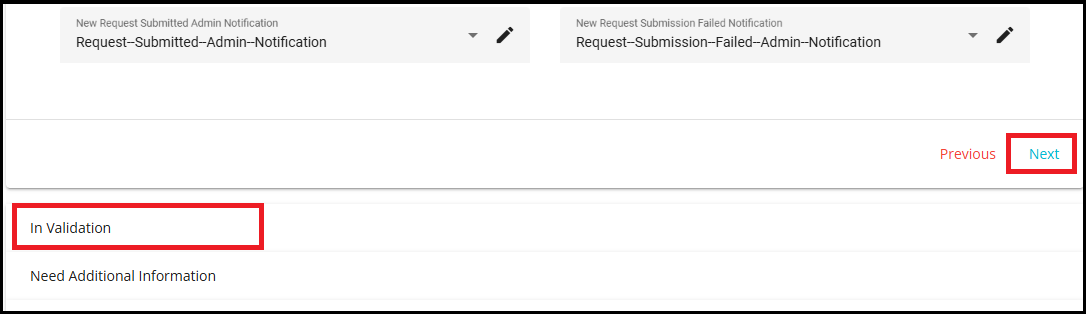
Click the 'Next' button on the 'Unverified or New' configuration to reach the 'In Validation' configuration page.
Another way to reach this page is by clicking the 'In Validation' option on the Flow Screen.
To automate the Validation stage,
Click on the In Validation option on the Flow screen.
Select Yes for the "Automate Phase?" option.

The following tasks are automated in this stage --
a. Creating the On Behalf Action Item.
b. Action item creation strategy -- the system creates the action items for the request all at once or one after the other based on the flow configuration.
c. Action item match strategy -- checks if all the action items are match found or if any of them is match not found based on the configuration, to move to the next stage.
d. Send an email accepting the request or asking for additional information based on the match strategy. e. Send reminder emails based on the configured reminder frequency.
You can continue to configure these steps irrespective of automating the Validation stage.
Send Email Notification Checkbox
The Send Email Notification checkbox controls whether email notifications are sent to the users or user groups specified in the Action Item Configuration.
When enabled: All users or groups added to the action item will receive email notifications related to the progress or status of that action item.
When disabled: No email notifications will be sent for that action item, even if users or groups are specified.

On Behalf Action Item -- This scenario arises when an agent submits a request on behalf of the user. An authorization letter or power of attorney, along with valid ID proof, should be submitted by the user when granting the rights to an agent to make DSA requests on behalf of them. Such requests are handled separately.
Note: The "Submitting requests on behalf of someone" feature is available only to California (CA) residents, as per privacy law.
In case of an opt-out request, the 'On behalf Action Item' is created first and processed. The 'In Validation' other action items are created only after the On Behalf Action Item is successfully validated. If not validated, such requests are either closed or sent to the 'Need Additional Information' stage, asking the user and agent for additional information.
When creating an on-behalf action item, the request is checked for authorization, and the request is processed after that. Every communication related to such request is sent to both the user and the agent.
Select the email addresses or User group from the Email To drop down list.
From the drop-down menu, Select Template, Agent Additional Information Template, Close Agent Not Verified, and Close Agent Additional Information Template.
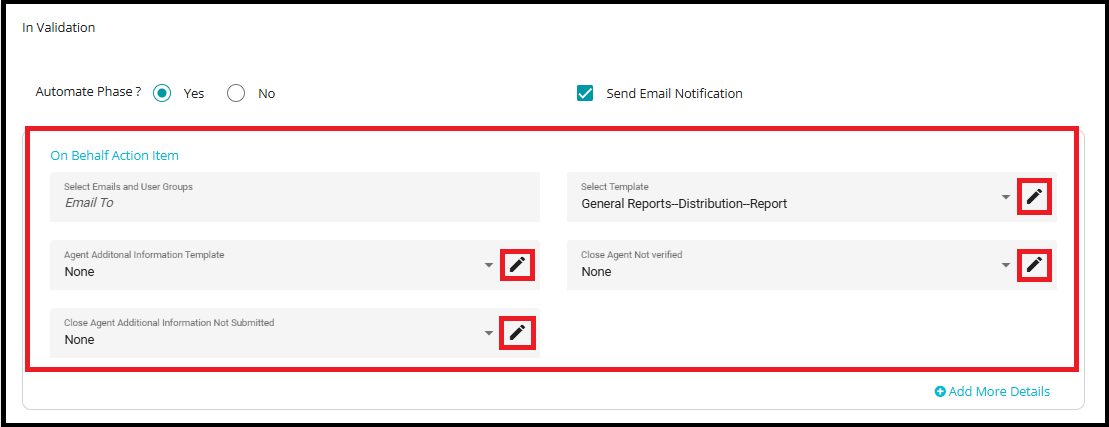
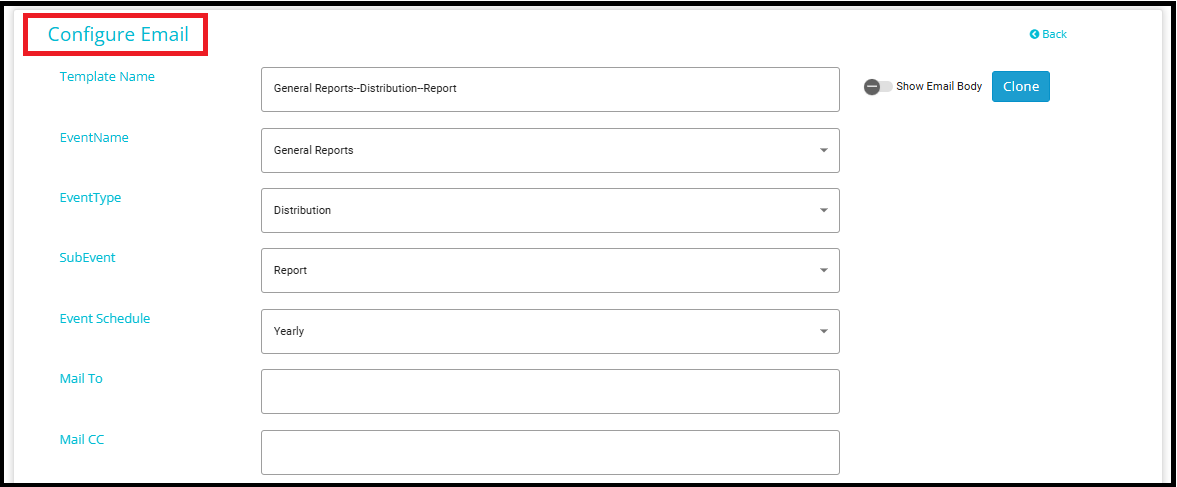
By clicking the edit icon next to a template field, you will be navigated to the Configure Email page.
On the Configure Email page, you can customize the template details.
For more details on configuring email templates, please refer to "How to Configure Email Templates| Meru Data"
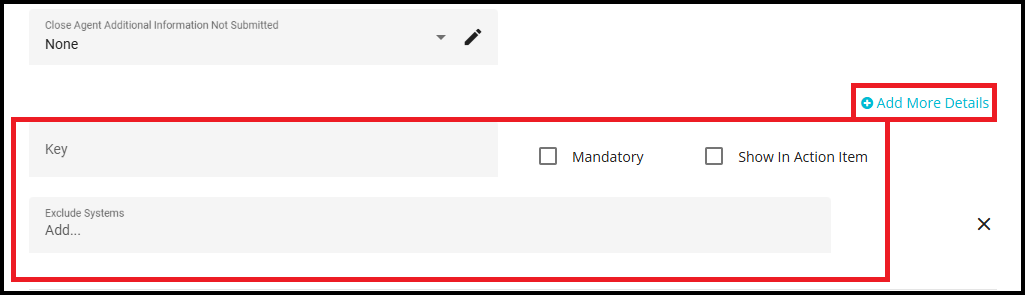
- Use the '+Add More Details' option to specify additional points or details that need to be validated.
Key
The Key field is used to specify additional information or checkpoints required when a request is submitted on behalf of someone else. For example, you can add keys such as user email, phone number,customer type, transaction details, and more.
These keys help ensure that all relevant details are collected and validated for requests made on behalf of another individual.
Mandatory
When selected, the key becomes mandatory.
The validator must provide a response for this key before the action item can be completed.
Show In Action Item
- When this option is enabled, the response from the validate action items will be displayed on the process action items. This allows the processor to view the validator's notes or responses directly, ensuring transparency and continuity in the workflow.
Exclude Systems
This field allows you to specify systems that should be excluded based on the key configuration.
Excluded systems will not be considered during downstream processing.
Create Strategy -- In case of multiple action items for a request flow, this option can be used to choose how the system action items are created in the Validation stage.
Action items for validation can be sent to different teams or individuals internally, who will be responsible for validating the user's details.
All at once: Creates all the action items at once and sends them for validation simultaneously.
One By One: By selecting the One-by-One option, a new action item is created only after the previous one is responded to. Even if the previous action item is marked as "Match Not Found," the next action item is still created. After all responses are collected, the request moves to the "Need Additional Information" state with all fields marked as "Match Not Found".
Reference: Uses conditional, rule-based logic to control the creation of subsequent action items. Based on the response to the current action item, the system determines whether to create the next action item or keep the request in its current state.

To create system action items in the Validation stage,
- Click on

The screen shows a form with different fields to be configured for creating the Action Item.
Action Item Name: By default, the action items will be named Action Item 1, Action Item 2, Action Item 3, etc. However, users can assign custom names to each action item as needed.
- Click on the 'Email To' drop-down menu.
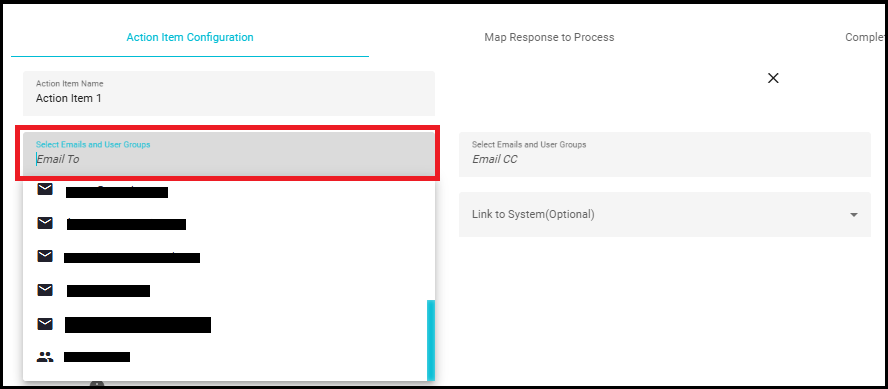
Action items will be initiated to the selected user.
- Use the 'Email CC' option to email any users in CC.
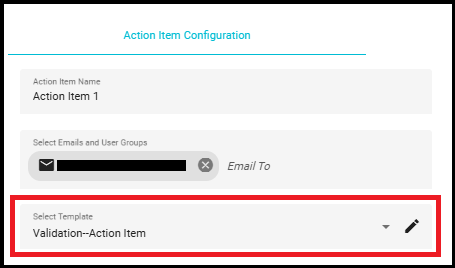
You can configure a specific template to send emails to the users based on the response to and from the action items.
Click on the 'Select Template' drop-down menu.
Select the required email template from the menu.
Link to System (Optional): Allows you to optionally link an action item to a system selected from the dropdown. Leaving this field blank does not impact action item processing.

The Match Found and Match Not Found fields can be customized through the DSAR -- Flow Configuration screen to suit different validation and display requirements.
If you want these fields to be displayed,
- Select the 'Yes' option.
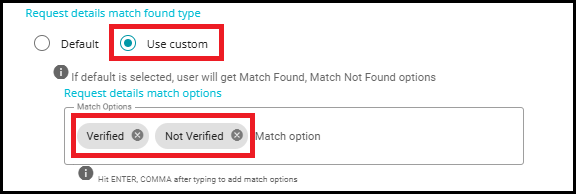
Note: The screen shows two options Default and Use Custom for displaying the fields.
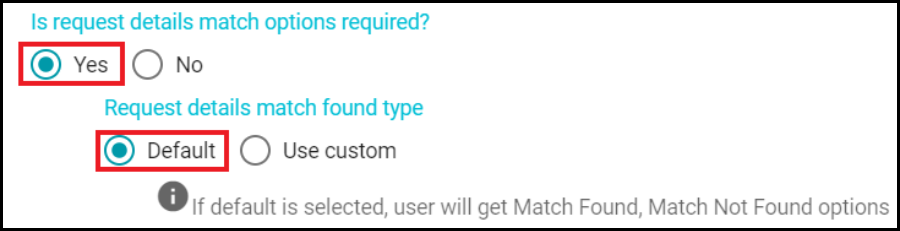
- When selecting Default, the validators can see the fields as Match Found and Match Not Found, as the default display names.
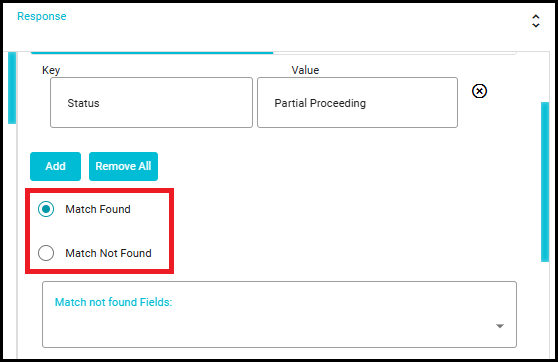
- However, if you want to customize these fields with different display names, you can select the 'Use Custom' option and configure the names in the 'Request details match options' dialog box by entering the required option name and clicking on enter.

- When the validator selects Match Not Found as the response, the validator must select the fields from the dropdown that did not match (such as Primary Email, First Name, Address, State, etc.).
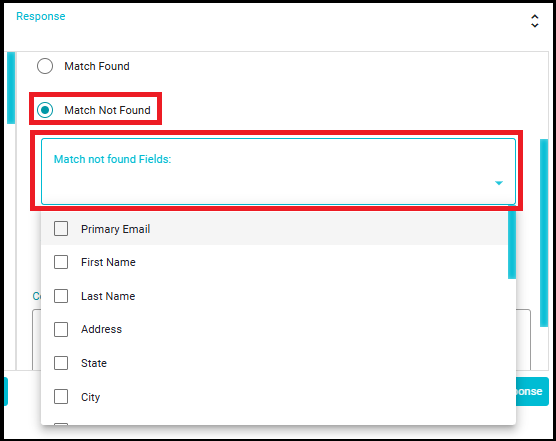
- If the validator does not select any fields, the system will prevent submission and display a snack bar message stating: "Select Match Not found Fields".

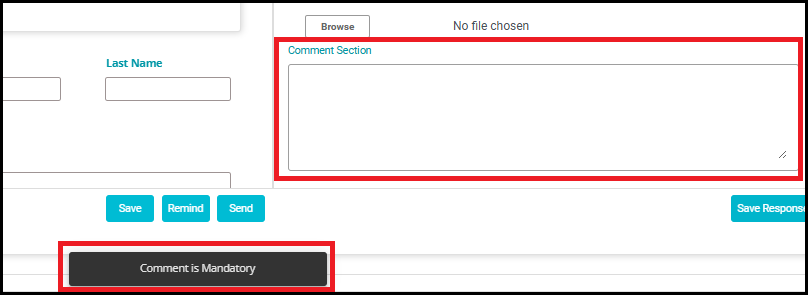
Comment Required
The Comment Required checkbox is used to mandate additional remarks from the validator when selecting a match option.
When this checkbox is enabled, the validator must enter a comment while responding to the action item.
The action item cannot be completed unless a comment is provided.
Key options are used to configure the team to which the request must be directed.
A Key represents the checkpoints used to validate the end user during the In Validation stage. These checkpoints help confirm the authenticity of the request by verifying specific details provided by the user.
- Check the 'Mandatory' option if a specific key requires it to be mandated.
The Key Type determines how the validator provides input for a key.
Two types are supported:
1.Text
When Text is selected, the validator is required to provide user information.
The User Info field appears as a dropdown, allowing the validator to select the appropriate user-related‑ attribute (for example, email, phone number, etc.).
This option is typically used when validation requires freeform or user specific‑ information.

Specific Use Case:
Suppose the end user submits a request and provides an email and phone number.
During validation, the validator may discover more contact details.
The validator must respond by entering the email field and the phone in the phone field.
The system will then create new requests in the tool for those additional details, ensuring accurate tracking and validation.

Behavior When User Info Is Not Selected:
If the User Info field is not selected, you need to configure the Key Name and Value manually.
The value field will be a free-text input, allowing the validator to enter any relevant information.

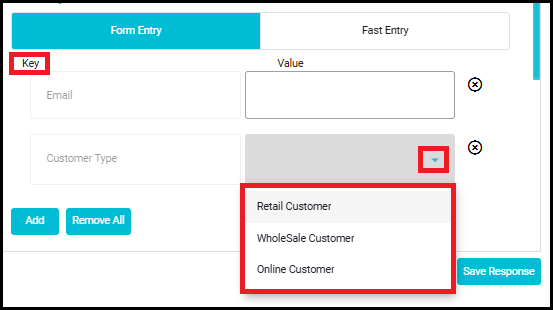
- Dropdown:
- When Dropdown is selected, predefined values must be configured for the key.
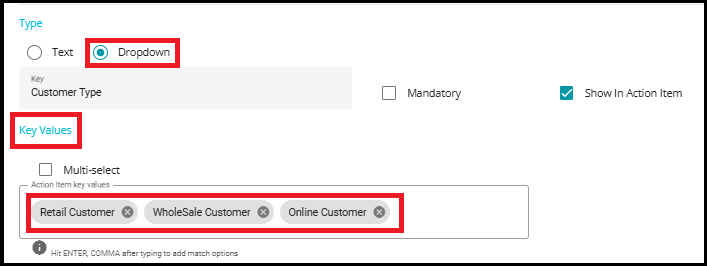
- These values are the options that will be visible to the validator while responding to the action item.
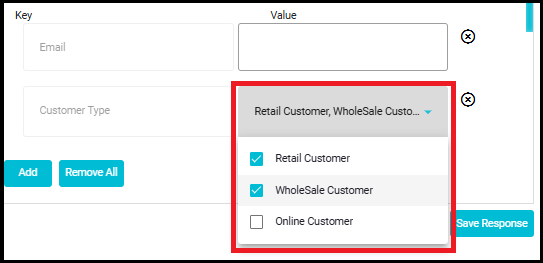
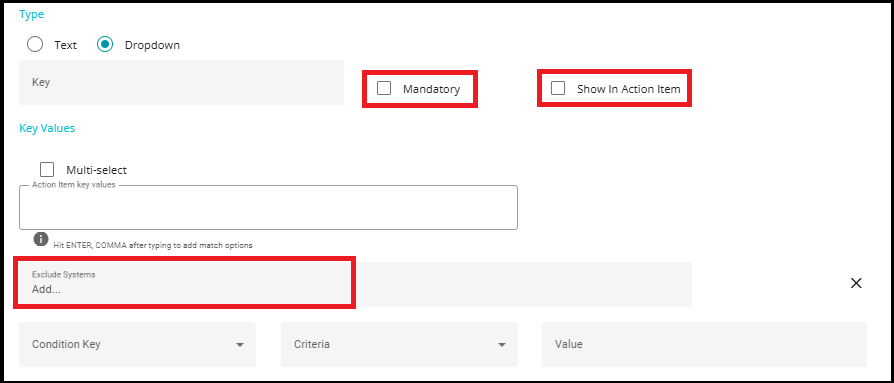
Multi - Select
When the Multiselect, checkbox is enabled, the validator can select multiple values from the dropdown.
When disabled, only a single value can be selected.

Mandatory
When selected, the key becomes mandatory.
The validator must provide a response for this key before the action item can be completed.
Show in Action Item
When this option is enabled, the response from the validate action items will be displayed on the process action items. This allows the processor to view the validator's notes or responses directly, ensuring transparency and continuity in the workflow.

Exclude Systems
This field allows you to specify systems that should be excluded based on the key configuration.
Excluded systems will not be considered during downstream processing.
Initial Key Creation
Condition Key, Criteria, and Value fields do not appear when creating the first key.
These fields become available only after at least one key is created.
Condition Key
- The Condition Key dropdown lists previously created keys, allowing one of them to be selected for defining conditional logic.
Criteria
The Criteria field defines how the condition key is evaluated.
Available options include - Equals, Contains, Does Not Contains and Starts With.
Value
- The Value field is used to enter the comparison value.

Map Response to Process
In the 'In Validation' stage, every action item shows a tab 'Map Response to Process'.
Note: By default, Map the response to a process action item is set to No.
When you select Yes for "Map the response to a process action item, the system will use the validation response to determine which process action items should be created in the process stage.
Click on Add Condition to define conditions for mapping the response to a process action item.
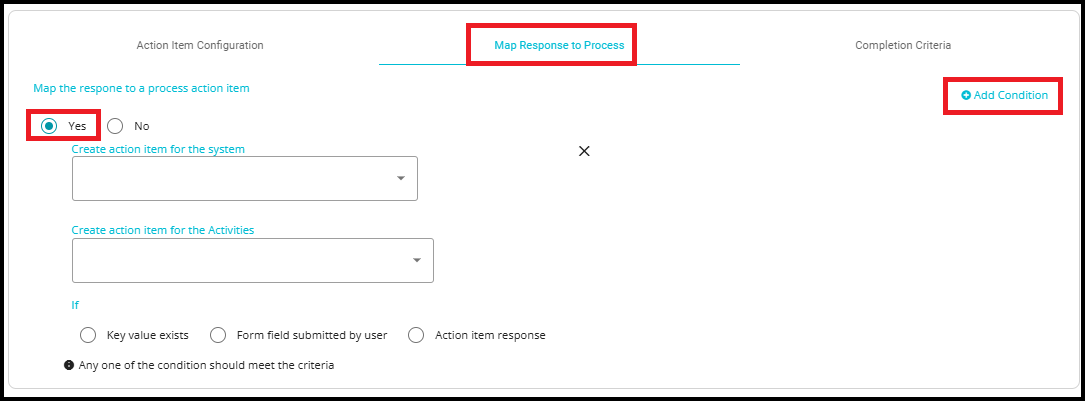
- For example, if the validator selects "Retail Customer" as the customer type during validation, the system may create an AWS action item in the process stage. If "Wholesale" is selected, the AWS action item will not be created. This ensures that process action items are dynamically generated based on the validation outcomes, rather than being statically mapped.

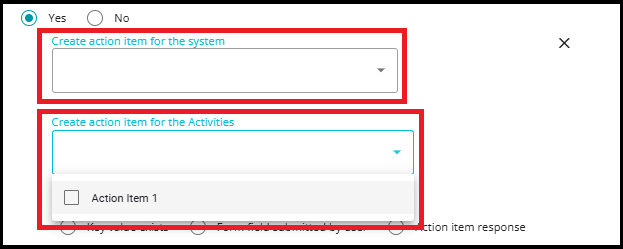
Here, you can map the response to a process action item in two ways -- by creating an action item for the system, and by creating an action item for the Activities (These refer to the action items that are created in the Process phase of the workflow).
The Create action item for the system and Create action item for the activities dropdowns display the systems and activities that are configured in the Process phase of the workflow. This allows you to directly map validation responses to the corresponding system or activity action items defined in the process stage.
Systems: Action items created for systems are sent only to people who are registered in the Data Governance Tool (DGT). These users have access to the platform and can participate directly in the workflow.
Activities: Activities are action items that can be directed to individuals who are not registered in DGT.
Note: In these fields, the systems or activities will be shown as dropdown options, listing only those that are configured in the Process phase. Therefore, the Process phase setup must be completed before you configure the map response to process.
To map the response by creating an action item from the Activities,
Click on the Create action item for the Activities dialog box to open the drop-down menu.
Select the required Activity from the menu.
You can see three options on the screen -- Key value exists, form field submitted by user, and action item response.
- Clicking on Key value exists provides a drop-down menu showing all the keys configured for the action item.
Note: Key value exists does not support keys of type Text. It must be a Dropdown key, so the dropdown values will be visible and selectable in the menu. This ensures that only keys with predefined options can be used for this condition.
- Select the appropriate option from the drop-down menu.
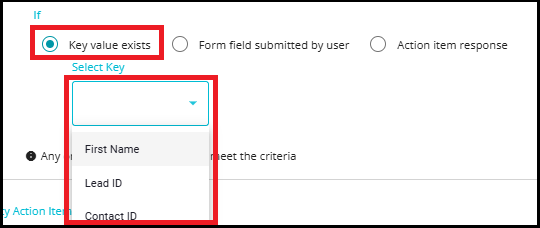
Note: In this case, the system will only be created if the selected key is answered by the person validating the action item. If there is no input for the selected key, a process action item for system dependencies cannot be created.
Clicking on the Form field submitted by the user provides another drop-down menu showing different fields of a form.
Select the required field from the menu.
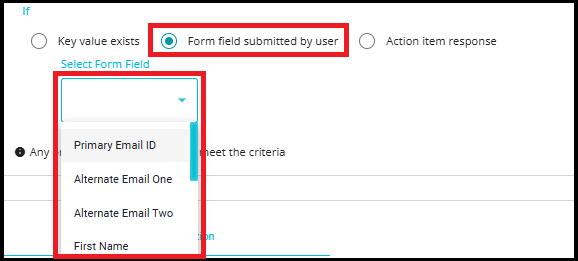
Note: In this case, the system will only be created if the selected field has an input from the user submitting the request. If there is no input for the selected field, a process action item for system dependencies cannot be created.
- When Action Item Response is selected, the Select match option dropdown displays the response values that were configured in the Action Item Configuration screen for the Request details match options.
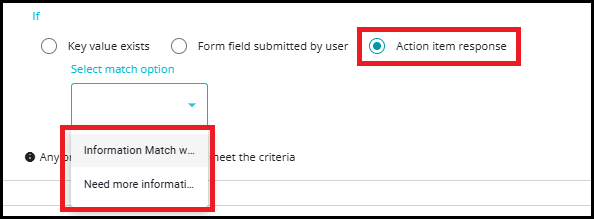
Note:
If custom values have been configured for the Request details match options, those custom values will appear in the dropdown.
If no custom values are configured, the system displays the default options: Match Found, Match Not Found.
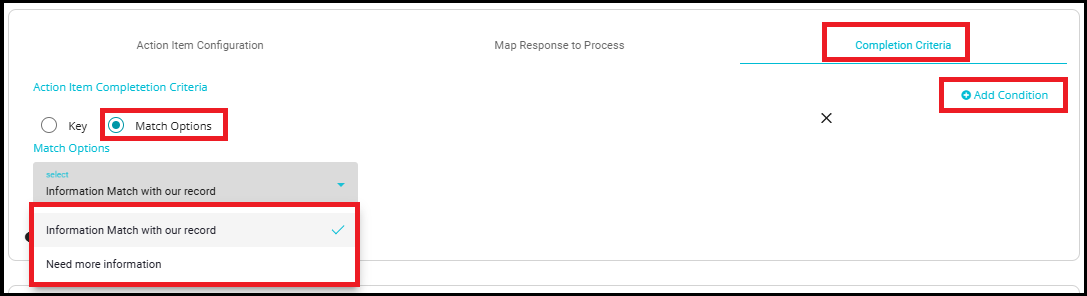
Completion Criteria:
Navigate to the 'Completion Criteria' tab if you want to add criteria for completing action items.
By adding completion criteria, the system determines whether to move the request to the next phase, seek additional information, reject, close, or complete the request.
Click on Add Condition to define conditions for the Completion Criteria.
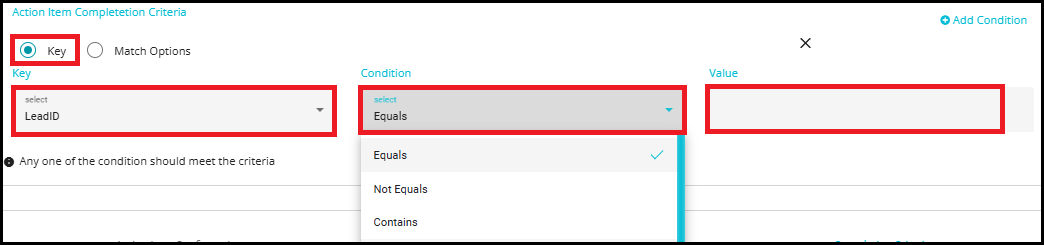
It gives two options -- Key and Match Options.
Match options -- drop-down menu showing different conditions for a possible match. The action item would be marked complete if the match option matches with the selected condition. This list of values comes from the Request details match options.
Key - In this case, the action item is considered responded to if the selected key has a response from the validator. Based on whether the completion criteria are met or not, the request will move to the next phase according to the custom flow configuration.
Select a key from the 'Key' drop-down menu.
Select the required 'Condition' for the key from the drop-down menu.
Define the 'Value' to be compared with the input.
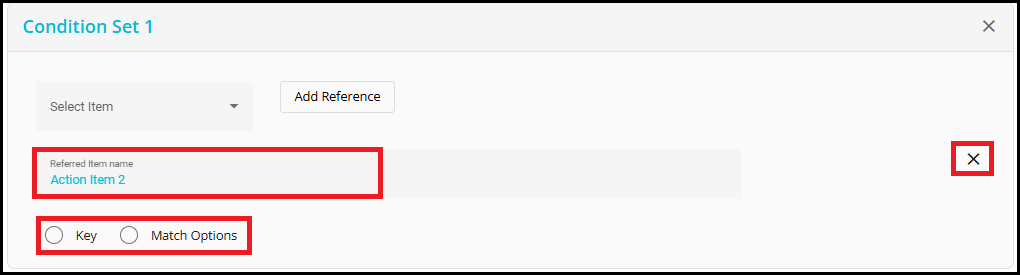
Reference Items
- Selecting the Reference option adds an additional tab named Reference Items in the Create Action Item configuration.

Click on the Add Condition Set to define reference-based rules that control the creation of subsequent action items.
Each Condition Set represents a logical group of reference conditions.
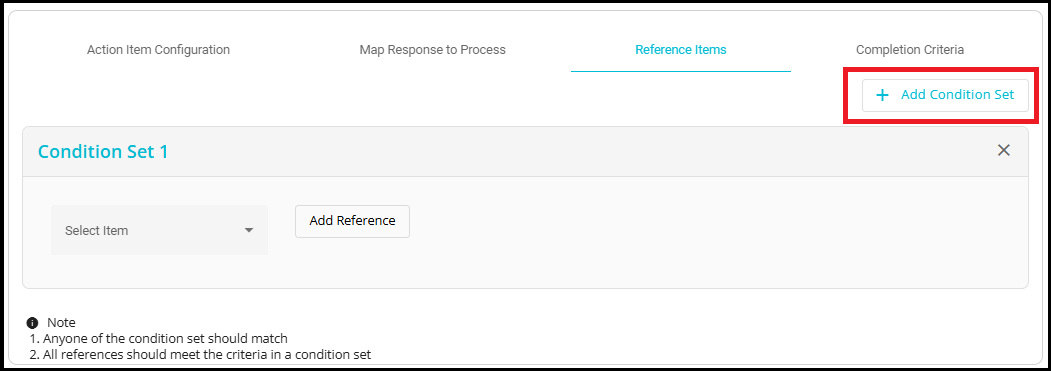
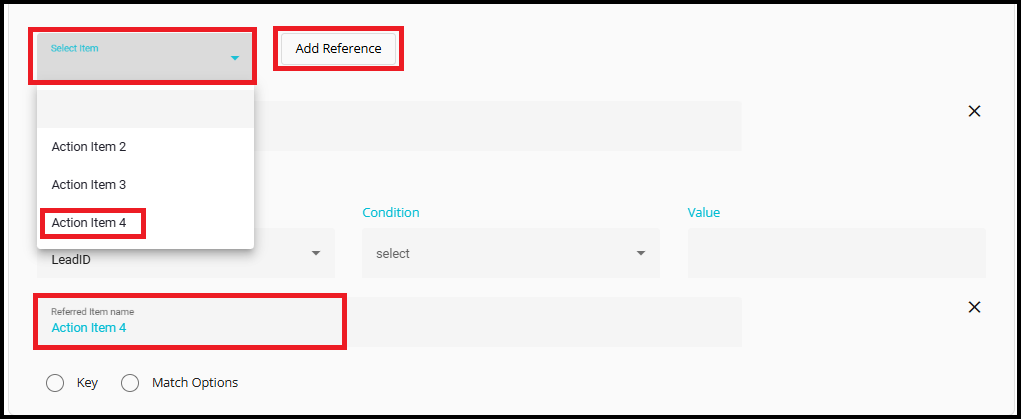
Click on the Select Item dropdown to view the list of available action items.
Select the required action item from the menu. The list displays action items that have already been configured in the workflow.
After selecting the action item, click Add Reference to add it as a reference within the condition set.
The added reference will be used to define rule-based logic that determines whether subsequent action items should be created.

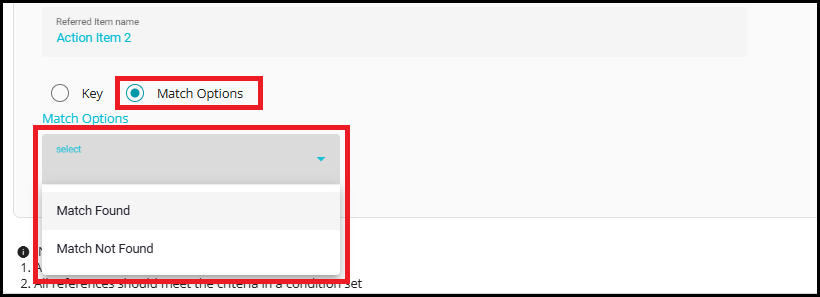
After clicking on Add Reference, the Referenced Item Name is displayed for the selected action item. The referenced item is provided with two options: Key and Match Options
These options define how the reference condition is evaluated for the selected action item.
You can click on the X icon to delete the reference if it is no longer required.
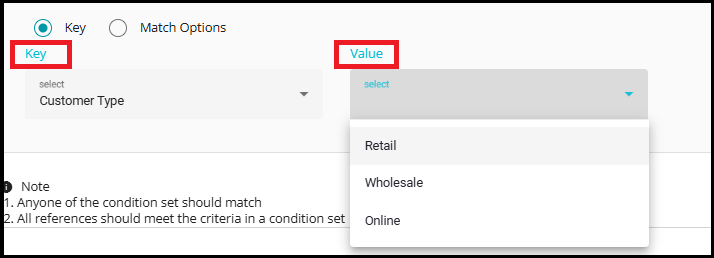
Key Option
- When Key is selected, the fields displayed depend on the Key Type configured in the Action Item Configuration tab.
For Text type Keys following fields are displayed:
Key -- A dropdown listing all the keys that have already been created in the Action Item Configuration.
Condition -- A dropdown containing operators such as Equals, Not Equals, Contains, and Does Not Contain etc.
Value -- A user entered value that is evaluated against the selected key and condition.

For Drop-down type Keys following fields are displayed:
Key -- A dropdown listing all previously created drop-down type keys.
Value -- A dropdown displaying the values that were configured earlier in the Action Item Configuration for the selected key.
Match Options
When Match Options is selected, the Match Options dropdown displays the response values configured for the action item.
If no custom values are configured, the system displays the default options: Match Found and Match Not Found
These options are used to evaluate the reference condition based on the action item response.
Within a Condition Set, you can add multiple references by clicking Add Reference.
All references within a condition set must meet the defined criteria for the condition set to be considered successful (AND logic within a condition set).
You can add multiple conditions by clicking on the Add Condition Set.
To remove a condition set, click on the X icon corresponding to that condition set.

When multiple Condition Sets are configured, the system evaluates them using OR logic.
This means that if any one of the condition sets matches, the reference condition is satisfied, and the next action item is created.

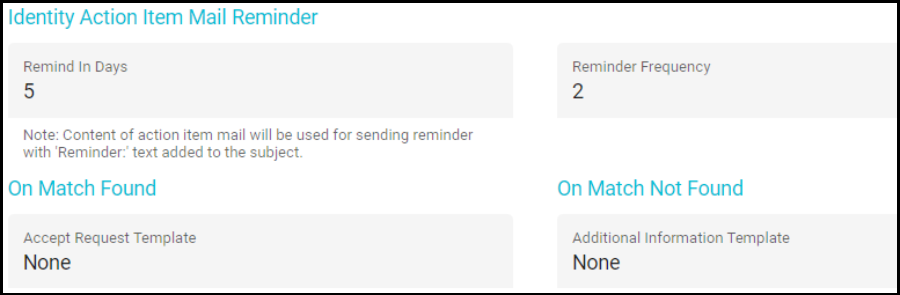
Identity Action Item Mail Reminder -- After sending the Action Item to the users, this field is used to configure reminder mails in case of no/delayed response.
- Remind in Days: you can specify the number of days after which the reminder email should be sent to the users.
For example, if you set Remind in Days to 5, the first reminder will be sent on the 5th day after the request is submitted.
- Reminder Frequency: used to specify the number of times the reminder email should be sent to the users.
For example, if Reminder Frequency is set to 2, the system will send two reminders:
The first reminder on the 5th day
The second reminder on the 10th day (5 days after the first reminder)
On Match Found
Defines the response that is sent to the user when the validation for the action items is successful, and the completion criteria are met.
When a match is found and the request is accepted, the system sends an email using the template configured under Accept Request Template.
On Match Not Found
Defines the response that is sent to the user when the validation for the action items is unsuccessful, and no match is found.
In this scenario, you can request additional information from the user by configuring an appropriate Additional Information email template.
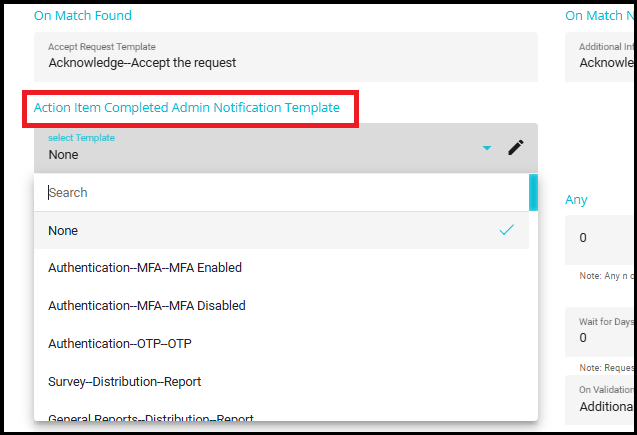
Action Item Completed Admin Notification Template
This dropdown menu is used to configure the email template for sending admin notifications during the request processing flow.
The notification is sent to the admin email address configured in the Alert Email section at the beginning of the flow.
These notifications help keep administrators informed about the progress and responses related to action items.
Note: Alert notifications are sent to the configured admins whenever there is a response to an action item, ensuring timely visibility into validation and processing updates.
Click on the Select Template dropdown menu.
Select the required email template from the list to be used for admin notifications.
Action Items Required to complete Validation
You can choose one or more action items from the list (for example, Action Item 1, Action Item 2, etc.).
It is important to note that this is not about the completion criteria of each action item, but simply about whether a response has been provided.
If multiple action items are marked as required, each of those action items must have a response. If any required action item does not have a response, the request will remain in the validation phase.
There is a special case when action items are created conditionally, such as when one action item is dependent on another through a reference. For example, suppose you have three action items: Action Item 1, Action Item 2, and Action Item 3. If Action Item 3 is configured to be created only when Action Item 2 meets a specific reference condition, and that condition is not met, Action Item 3 will never be created.
Even if all three action items are marked as required, the system only considers the required action items that were actually created. In this scenario, the absence of Action Item 3 (because its reference condition was not met, and it was never created) does not block the request from moving to the next phase. The system evaluates only the required action items that exist for the current request, ensuring the workflow progresses smoothly based on actual responses and created items.
Any
- Any field is used to specify the minimum number of required action items that must be completed.
For example:
- If 4 action items are selected and Any = 2, validation is completed when any 2 of the selected action items are completed successfully.
Note: If no value is specified, the default behavior applies, meaning all selected action items are required to complete validation.

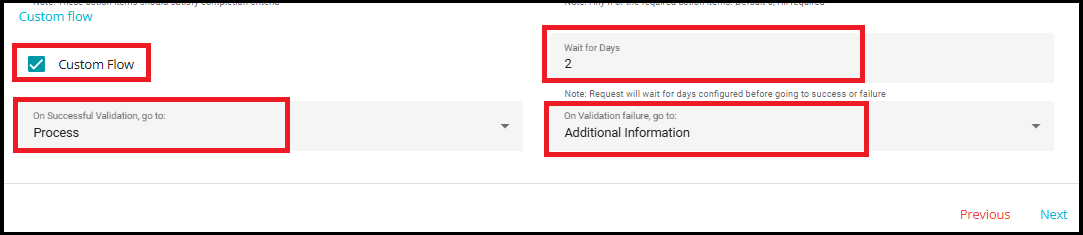
You can configure the 'Custom Flow' option in this stage too. Checking this option pops up three conditions to decide the flow.
On successful validation go to: Drop-down menu to select the next stage of the request if the validation is complete.
Validation is considered successful when all created action items are marked as "Match Found" or have met the defined completion criteria. Once this condition is met, the request can proceed to the next stage as configured in the workflow.
Wait for Days: Waiting time for the request before moving to the next stage based on its validation.
On validation failure, go to: Drop-down menu to select the next stage of the request if the validation is unsuccessful. You can now move to the next stage of the request flow.